Sunday, December 13, 2009

Blueberry Oat Muffins


So, this past summer I really got caught up with all of the delicious and beautiful blueberries that were available around here, and for a great price. Well, fast forward to December where I still have like 4 large freezer bags full of frozen blueberries! Figuring that I should probably use them up soon (...and realizing that you go through blueberries only so fast from making blueberry pancakes once a week...), I decided to make these low-fat blueberry oat muffins I had bookmarked the recipe for months ago. They were delicious! Not only do they have wonderful flavour, but with lots of blueberries in them the sweetness comes from the blueberries and not from loads of sugar. Go on, try them. Use up all your frozen blueberries. Of course they would be wonderful with fresh berries too :)

Low-Fat Blueberry Oat Muffins
Source: My Own Sweet Thyme
Makes 12 muffins

1 cup old-fashioned oats, uncooked (I actually used quick oats and they turned out great)
1 cup 1% buttermilk
2 egg whites, lightly beaten
2 Tbsp butter, melted
1/2 tsp grated lemon peel
1 cup flour
3 Tbsp sugar
1 tsp baking powder
1/2 tsp baking soda
1/4 tsp salt
1 cup blueberries (fresh or frozen)

1. Preheat oven to 400F; Lightly spray 12 muffins cups with cooking spray.

2. In a small bowl, combine the oats and the buttermilk, and let sit for 10 minutes. After it has sat for 10 minutes, mix in the egg whites, butter and lemon peel, stirring until well blended.

3. Meanwhile, in a separate bowl, combine your dry ingredients (flour, sugar, baking powder, baking soda and salt), mixing well.

4. Add the dry ingredients to the oats mixture, stirring until just moistened.

5. Gently fold in the blueberries.

6. Fill the muffin cups until nearly full, and bake about 20-25 minutes or until they just start to turn golden brown.

7. Cool in tins for about 5 minutes, then remove from pan and let cool on a wire rack. Delicious served warm or cold! Enjoy.

Sunday, November 15, 2009

Sweet Potato, Jalapeno and Corn Bisque


I've been wanting to make a soup lately that uses yams or sweet potatoes in it, and so when I saw this one at everybody likes sandwiches, I figured it would be perfect. The texture was really velveety, with just a bit of spice from the jalapeno, matched by the sweetness from the corn. A perfect soup to warm you up on those cold, windy and wet days that we've been experiencing lately around here!

Sweet Potato, Jalapeno and Corn Bisque
Adapted from everybody likes sandwiches (originally from The Wednesday Chef)
Serves 4

1 Tbsp olive oil
1 small onion
2 cloves garlic, minced
2 medium yams, peeled and chopped
1 medium sweet potato, peeled and chopped
3 cups chicken broth
1 jalapeno, seeded and finely chopped
1/2 cup frozen corn
1/2 tsp maple syrup
1/4 tsp salt (or to taste)
1/2 tsp ground pepper (or to taste)
tiny pinch of ground cinnamon

1. In a large pot, over medium heat, saute onions for a minute or so, then add garlic until fragrant. Add the yams and sweet potatoes, stirring for a few seconds.

2. Add the chicken stock - I used just enough to make sure that the vegetables are covered. Use more or less as needed. Cover, and boil over medium heat until cooked - about 10-15 minutes.

3. If you have an immersion blender, you could use that to puree the vegetables... I used a blender, pureeing in batches until everything was very smooth.

4. Return the soup to the soup pot, and add the jalapenos, corn, syrup, salt, pepper and cinnamon. Stir well, and adjust the seasoning as needed. Enjoy!

Tuesday, November 10, 2009

Lettuce Wraps


Oh. my. goodness. SO delicious! So, eventhough lettuce wraps are not the type of thing that we ever make (and I've really only had them like 3 times in my entire life before now), my sister passed this recipe on to me that she recently tried, and they were a HUGE hit. My husband I and both loved them. As is typical for what I look for in a recipe, they were very easy to make... and like I said they were delicious. The oyster sauce did seem like a funky ingredient never having used it before, but all of the ingredients together made this dish taste amazing. We had no leftovers!


Lettuce Wraps
Serves 3

1-2 heads butter lettuce
1 lb ground beef
1 Tbsp sesame oil
1 Tbsp olive oil
1 small yellow onion, diced
1/4" slice of fresh ginger, peeled and diced
1 garlic clove, finely chopped
1 red bell pepper, seeded and diced
1 can sliced water chestnuts, chopped
1 stalk celery, diced
1 Tbsp soy sauce
2 Tbsp oyster sauce
1 Tbsp sherry cooking wine
1 tsp sugar
1 tsp cornstarch
2 Tbsp cold water

1. Wash and dry the lettuce, separating the leaves. Try not to tear them since you'll use them as a wrap. Set aside

2. Heat the sesame and olive oil in a pan over medium heat. Add the onions and soften for a couple of minutes. Add the garlic and ginger, stirring constantly, cooking until fragrant.

3. Add the beef to the onion and garlic mixture, and brown the meat until fully cooked. Once cooked, remove the meat mixture from the pan and set aside.

4. Using the same pan, add a little bit more olive oil to the pan, and add the red pepper, water chestnuts and celery, cooking until softened (about 4-5 minutes). Once cooked, add the soy sauce, oyster sauce, sherry cooking wine and sugar to the pan - stir. Let it cook for a minute or two.

5. Mix the cornstarch and water together, and add to the vegetable mixture, stirring to thicken. Add the meat mixture back to the pan, and cook for a couple more minutes, stirring occasionally.

6. To serve, spoon some of the meat mixture onto the middle of one of the lettuce leafs. Wrap it like you would a taco or burrito, and enjoy!

Sunday, October 18, 2009

Mikyn's Chicken Pot Pie


Mmmm, comfort food. Sitting here, thinking about it, I actually wondered to myself how chicken pot pie became a comfort food? Seriously, I don't think I ever remember eating it growing up - and if we did, I think it was rare. In any case, they are pretty much a staple in our house now, especially now that I've starting to make my own. They are a HUGE hit around here - we all love them. Normally, I make my own pastry crusts and everything, but this week I thought I'd try something a bit different by using a cheese-filled biscuit topping... not only was it a success in that it tasted really good, but by eliminating the pastry, it cuts out a lot of the extra calories normally found in pot pies. Calories aside, it's yum. Comfort food, yum.

Chicken Pot Pie
Mikyn's Kitchen
Serves 8 mini pot-pies or 1 large 9x11 pie

2-3 cups chicken broth
3 carrots, chopped
3 stalks celery, chopped
2 small potatoes, chopped (I used russet potatoes)
1 medium onion, chopped
1 cup frozen peas
1 cup roasted chicken, cut into bite-size pieces (or more if desired)
Sprinkle of marjoram
1 bay leaf
1/2 cup butter or margarine
1/2 cup flour
1 cup milk
salt and pepper to taste

1) Boil carrots, celery, onion and potatoes in chicken broth. Add marjoram and bay leaf; Season with salt and pepper. Once cooked, reserve chicken broth and set veggies aside.

2) Make a basic white sauce with butter, flour and milk. It will be very thick; add the reserved chicken broth to the white sauce to thin to desired thickness, making sure to keep it fairly thick. You want it to be a gravy consistency.

3) Add the peas, chicken, and reserved cooked vegetables to the gravy sauce, stirring gently.

4) Fill individual ramekins (or pot pie shells) with the vegetable/gravy mixture, and top with biscuit topping. I used this one, but instead of the raisins, use about a 1/4 cup of grated cheese. Bake at 425F for 12-14 minutes.


If you want to freeze the pot pies for future use, I recommend allowing the sauce to cool first, and then fill either your raw pie shells (or top with uncooked biscuit topping), and stick straight into the freezer to bake later. It's comfort food at it's best.

Monday, October 12, 2009

Pork Gyoza's


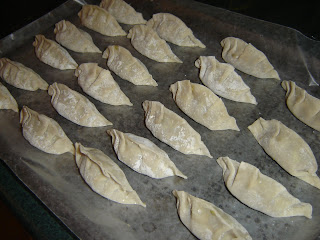
This past spring, I spent many of my days passing the time by watching the food network on tv, and saw this recipe by Anna Olson for Gyoza's and knew that I had to make them. It took me so long to try them out, because it seemed a bit daunting! When I finally did though, I was pleasantly surprised - they were surprisingly simple to prep and cook, AND they were delicious! They have the perfect blend of tang from the ginger and soy sauce, and are a nice light meal. I served the gyoza's with Anna's basic dipping sauce, and fresh vegetables.

While they are simple to make, the prep is a bit time consuming, and so you might as well make a whole batch all at once and freeze the rest - and that's what I did. They freeze really well, and in fact it makes them easier to cook.

Pork Gyoza's & Basic Dipping Sauce
Yields about 70 individual dumplings

Pork Gyoza's
1 pound green cabbage, finely chopped
2 tbsp garlic, minced
2 tbsp ginger, minced
1 pound ground pork
1/4 cup low sodium soy sauce
1 tbsp white sugar
2 packages round wonton skins, 70 piece (the one I bought came in a 2 pkg set)
1 tbsp olive oil (for cooking)
Hot water (for cooking)

Basic Dipping Sauce
2 tbsp low sodium soy sauce
1 tbsp rice vinegar
1/4 cup sesame oil

1. Using a food processor, blend in batches the cabbage until finely chopped, and transfer to a large bowl. Add the garlic and ginger and blend until finely minced, and add to the cabbage. Add to the cabbage mixture the ground pork, soy sauce and sugar, and mix. Fry a small patty in a pan to test for seasoning, and adjust to taste.

2. In order to prevent the gyoza's and wonton skins from drying out while I worked, I kept them covered, and worked in small batches of about 4 or 5: Brush the outside edge of the wonton skin with water, and please a teaspoon full of the meat mixture in the centre. Folder over the wonton skin to make a half circle shaped dumpling, and press the edges to seal the seam.

3. Place the dumpling seam-up on a wax paper lined baking sheet, and lightly press down to make the bottom surface flat.


4. Once you've filled up the tray, cover with plastic wrap and freeze for several hours. Once frozen, transfer the frozen gyozas to plastic freezer bags until ready to use.

5. To cook, heat the olive oil in a frying pan and add the frozen gyozas flat side down to the pan in order to brown slightly.

6. Add hot water to the pan to almost cover the dumplings, and cook about 8 minutes.

7. Remove the lid every so often, and gently shake the pan. Once cooked, and once the water nearly evaporates (or if it doesn't evaporate, drain out most of the remaining water), and allow the gyoza to fry in the remaining oil for another minute.

8. Mix together the basic dipping sauce ingredients soy sauce, rice vinegar and sesame oil, and serve with gyoza's. Enjoy!

Monday, October 5, 2009

Baking Powder Tea Biscuits


You know, for the reward you get from something so simple, it's a wonder that I don't make these every week. The only take about 20 minutes or so from start to fully cooked, and are SO GOOD when they are done. I've tried these tea biscuits plain and they were delicious at that (particularly when they're hot out of the oven), but they are even better when you add extras to them! I've tried quite a few variations, and so it's pretty fun to adapt them depending on your mood, or whatever you're having that day. The ones I have pictured here have raisins in them, which was a complete home run with grandma - these ones go absolutely perfect as an afternoon snack with tea or coffee. For my husband and I, our favorite is when I make them to go with chili - in that case, instead of raisins I use grated cheddar cheese instead.

I have to admit, I did have a bit of a disastrous experience when I tried to make these with frozen blueberries. Don't do it. If you aren't going to listen to me, and are going to attempt these with frozen blueberries (or any fruit for that matter), do NOT let the berries thaw first - that's where I went wrong - keep them frozen or else they burst and make the batter much much too moist. Picture me standing in the kitchen with a gloppy mess, and grandma walking in, looking at me and just saying "what are you making??" Despite the mess, I cooked them anyways. Definitely not as pretty looking as the others, but they taste good still. So there.

So, go ahead and try them - it can't go worse than what I experienced.


Baking Powder Tea Biscuits
Source: Unknown (I got this recipe off a girlfriend, but don't know where she got the recipe from)
Yields 10-18 biscuits

2 cups all-purpose flour
4 tsp baking powder
1 tsp salt
1/4 cup butter, cubed
1 cup milk (I used 1%)
(Optional - whatever addition you want to add such as a handful of raisins, cheddar cheese, or gasp! frozen blueberries)

1. Preheat oven to 450F degrees.

2. In a large bowl, mix together flour, baking powder and salt. Cut in the butter with a fork until the mixture is the consistency of cornmeal. **If you are going to add any extras such as raisins like I've done, now is the time to add them.

3. Make a well in the centre of the flour and add the milk. Once added, stir vigorously until the mixture comes free from the sides of the bowl. Turn dough out onto a lightly floured board and knead lightly for a couple of minutes.

4. Roll the dough out to about 1/2 inch thick, and cut dough into biscuits with a 2" biscuit cutter (or simply an overturned glass like I've used).

5. Bake for 12-15 minutes. Around here, they definitely taste best hot served straight from the oven, though you could let them cool on a cooling rack if they last that long. Enjoy!

Sunday, October 4, 2009

End of Soup Week: Creamy Chicken and Wild Rice Soup


So, I decided one day that it was time to venture out from my corn chowders and chicken noodle soups, and like usual wanted something quick and simple. You know when co-workers start saying to you "how's the corn chowder?" before they even see what soup I'm eating that particular day, that it's time to vary it a little bit! Well, I had seen this recipe a couple of months back on the Picky-Palate, and not only did it look delicious, but I knew I wanted to try it right away - especially since I happened to have all of the ingredients on hand. I think its both the wild rice and the spinach in this soup that make it so tasty. Since I freeze all of my soups to enjoy later on for work lunches, I just leave the spinach out when I freeze it, then add it to the soup once it's reheated.

Creamy Chicken and Wild Rice Soup
Source: Picky-Palate
Serves 6

1 onion, chopped
4 carrots, diced
3 cloves garlic, minced
3 cups homemade chicken broth
1 can Cream of chicken soup
1 can Cheddar cheese soup
3/4 cup milk (I used soy milk)
2 cups roasted chicken breast, chopped into bite-sized pieces
1 cup cooked wild rice
Salt and pepper to taste
Spinach, shredded into smaller pieces (For a whole pot of soup about 4 cups; for individual soup about 1/2 handful per bowl)

1. In a large pot, saute onions and carrots over medium heat until soft (about 5-7 minutes). Add garlic, and cook stirring constantly for another 60 seconds or so.

2. Add chicken broth, cream of chicken soup, cheddar cheese soup, milk, chicken, salt and pepper. Bring soup to a boil. Once heated through, remove from heat and stir in the spinach. Serve immediately ~ enjoy!

Friday, October 2, 2009

Soup Week: Roasted Chicken and Barley Soup


Since I had a lot of time on my hands this past winter, and wanted something else to do whenever I had the energy to do it, I thought making homemade chicken noodle soup would be a good start. It was pleasantly simple to make, and was an excellent comfort food on top of that. I've never been a fan of the packaged or canned chicken soups out there, and now I'll never go back. The soup is so delicious and is full of tons of vegetables, nice big chunks of roasted chicken, and lots of flavour. Thanks to my grandma for teaching me how to make this.

PART 1: Homemade Chicken Broth
Mikyn's Kitchen

Chicken carcass and bones, meat removed
10-12 cups water
4 carrots, chopped
4 stalks celery, chopped
1 onion, chopped
1 tbsp dried thyme
1 tbsp dried basil
1 tsp dried marjoram
1 bay leaf
1 whole clove garlic, peeled (optional)
Salt
Pepper

Homemade chicken broth is most easily made from the leftover bones and carcass of a roasting chicken. Once the chicken is roasted, remove as much of the chicken meat from the bones as possible, reserving for future use (If you leave the meat on the bones, it tends to go rubbery, and so it's better to remove before making the broth).

In a large pot, add the bones, carrots, celery, onions, water and spices, and bring to a boil. Once the water comes to a boil, remove any scum, reduce the heat and simmer on low for 1.5-2 hours. After a couple of hours, taste and re-season as necessary - salt is definitely the key here. Don't be afraid to add some - it will still be less than the canned versions in the store.

Strain out the vegetables, bones and bay leaf, reserving the broth. If you allow the broth to cool in the fridge overnight, you can easily remove any fat that may have solidified on top - I find though that the roasting of the chicken actually renders most of the fat, and so there's usually very little left. Enjoy as needed in your recipes.

PART 2: Roasted Chicken and Barley Soup
Mikyn's Kitchen
Serves 8

10 cups homemade chicken broth
4 carrots, chopped
4 stalks celery, chopped
1 onion, chopped
1 cup roasted chicken, chopped into bite-sized pieces
1/3 cup barley
Salt and pepper to taste

1. In a large pot, add the chicken broth and bring to a boil. Add carrots, celery, onions and barley, and cook until soft.

2. When nearly done, add the chicken and heat through. Taste and re-season as necessary. Enjoy!

Wednesday, September 30, 2009

Soup Week: Hot Cheese Soup


A couple of weeks back we had tacos for dinner, and whenever we have tacos for dinner, I always make this soup the next day with any leftovers we have left in the fridge - it's the perfect soup to use them up and is so easy! Actually, again it's a soup that my dad always made growing up, and I've continued doing it over the years. The soup itself is really cheesy, and pretty hearty (with the meat and tomatoes), and what really makes it is so good is that it's nice and spicy. I LOVE it, but my husband doesn't care for it. Oh well, more for me!

Hot Cheese Soup
Mikyn's Kitchen
Serves 3-4

1 can Cheddar cheese soup
4 cups milk
1/4 pound or so fully cooked taco-seasoned ground beef
1/4 cup cheddar cheese, shredded
1/3 cup tomatoes, chopped
1/4 cup taco sauce or salsa (I use the "medium" hot one)
Pinch of crushed red pepper flakes (optional)
Salt & pepper to taste

1. In a medium size saucepan, add the can of cheddar cheese soup, stirring and slowly adding the milk until incorporated.

2. Add the ground beef, cheddar cheese, tomatoes, salsa, crushed red pepper, salt and pepper. Stir, and bring to almost a boil. Let simmer for a couple of minutes to ensure that the meat is heated through. Taste and re-season as necessary. Serve and enjoy!

Monday, September 28, 2009

Soup Week: Best ever Corn Chowder


I know, I KNOW. I've only been doing this for a couple of months, and ALREADY another corn chowder recipe. Yes, ladies and gentlemen, I love this soup so much, I'm constantly trying out new corn chowder recipes. This though has to be one of my favourites so far. Perfectly spicy, lots of veggies and corn, and the bacon adds lots of extra flavour!

We just got back from two weeks out of town, with a week spent beside the lake and visiting one of our family member's farm. Seriously, who wouldn't want to look out at this every day?


Well, the last one isn't from the farm, but it is one of the areas we visited. I miss it already. So pretty, so relaxing, so fabulous. Oh, and lots of fresh organic vegetables and herbs right out of the garden. We were lucky enough to be able to bring some home with us, and so they immediately went into both the corn chowder and the borscht I made (both over the weekend). Again, lots of fun for me! This recipe I used for this soup was adapted from this one I saw on For the love of cooking. Her original recipe is delicious, and this one has even more of the flavours I love and was a huge hit for me. Can't get enough, and you won't be able to either.

Corn Chowder
Adapted slightly from For the Love of Cooking
Serves about 8

4 pieces of bacon, chopped into small pieces
1 onion, diced
1 celery stalk, diced
1 large carrot, diced
1/4 red bell pepper, diced
1/2 hot banana pepper, diced
2 cloves garlic, minced
1 russet potato, diced
1 yam or sweet potato, diced
4 cups chicken stock
3 sprigs fresh thyme (leaves only) or 1 tsp dried
1 bay leaf
4 cups corn (fresh or frozen)
3 cups milk
salt and pepper to taste

1. Cook bacon, and set aside.

2. Saute onions, celery, carrots and peppers until soft (about 8 minutes). Add garlic and thyme and cook for about another 45 seconds, stirring constantly.

3. Add stock, both potatoes, corn, bay leaf and salt and pepper and bring to a boil. Once it's reached a boil, in a separate bowl, ladle the hot soup into the milk until the milk is warm, then transfer into the hot soup. Simmer (being careful not to let it come to a boil), and cook until the potatoes are soft (about 10 minutes or so).

4. If you like a smoother soup, blend until smooth, but I much prefer the chunkier version (make sure to remove the bay leaf!). Mix in the reserved bacon (or use to garnish), and enjoy!

Soup Week: Dad's Borscht


Ok, ok, so I never promised to be a food stylist, nor an excellent photographer. So, forgive me when it comes to the picture. I think I took like 10 or more pictures of this same bowl of soup, and it seems that I'm still trying to figure out how to avoid flashes in the soup itself though here obviously I need to work on clarity. I'm working on it though!

I mentioned before that I'm a soup lover, and I think every time I talk to someone about cooking, I always always say that soup is my favourite thing to make. So, that's why I've decided to do a soup week. All are SO delicious!! Check in every day, and you'll find some delicious soups that I think are all currently or at least have been stocked in my freezer at some point over the last couple months.

Growing up, my father was the cook, and a fantastic one at that. While as a kid I could never bring myself to eat a soup that had both beets and cabbage in it, I do still have many memories of it being around quite often: Dad enjoying the "chunkier" version, and mom pureeing it for a "smoother" version. I personally vote for the chunkier version. I know what you're thinking... beets, cabbage and carrots in a soup? Could it really be that good? Well, if you've ever tried borscht (and even if you haven't), let me tell you that it IS good (and I'm pretty picky)... and no it is not "the devil in soup form" as I've heard it so affectionately referred to :) So, try it - you'll love it. And a huge thank you to my wonderful dad for passing on his recipe! I did adapt it a bit from his recipe, but it still turned out delicious.

Borscht
Adapted slightly
Serves 10-12

5 russet potatoes, shredded
2 carrots, shredded
1 large beet, shredded
2 stalks celery, shredded (omitted from original version)
4 cups chicken broth (or you could use beef broth... I used homemade)
1 tomato, chopped
1 medium onion, chopped
1/2 medium to large red cabbage, shredded
1 tbsp butter
1 tbsp olive oil
1 clove garlic, minced
3 stalks fresh dill, chopped and stalks removed (the key here is LOTS of fresh dill!)
1 tsp garlic powder
Salt and pepper to taste (about 1/2-1 tsp salt, 1 1/2 tsp pepper)

1. In a large pot, boil the potatoes, carrots, beet and celery in the chicken broth until soft, about 5 minutes. When it comes to a boil, add the tomato, and reduce it to a simmer. (Note: in my dad's version, rather than using shredded potatoes, he chops and boils the potatoes separately and then mashes them, adding lots of whipping cream and butter until the mixture is almost runny.... then add it to the vegetable/soup mixture to make a creamier and thicker soup. This sounds incredible, though I opted for the healthier version by omitting both).

2. Using the butter and the olive oil, fry the cabbage and onions until just softened, about 7 minutes. Add the garlic and saute for another 60 seconds. Once cooked, add the whole mixture to the vegetable mixture. Season with dill, garlic powder, salt and pepper, seasoning to taste. With the salt especially, season with just a little bit, then taste it and re-season as necessary. Be sure to use a bit of a heavy hand with the pepper. It'll give you a bit of a spicier soup, and it's delicious! Bring to a boil and enjoy!

Saturday, September 5, 2009

Meat Sauce with Garlic and Oregano


This pasta meat sauce is officially my favourite sauce to go on pasta! Around here, we are definitely a family that prefers the typical meaty red sauce on our pasta (except for the occasional indulgence of fettucine alfredo at a restaurant!)... and I have to say that up until about a month ago, I thought my go-to pasta sauce was one of the best ones I've had. That is, until I had this one. Oh my goodness did I ever love it! I was visiting my sister and her husband this summer, and she made this for us all one night for dinner. My sister is so amazing, and always makes such delicious meals... so inspiring! I think she gets her talent from the two fantastic cooks in our family: her husband is a talented and well known chef in their community, and our dad (who did all the cooking growing up) is also an excellent cook. Well, they've taught her well. This recipe is her recipe that her and her husband have come up with, and so I've tried to recreate it with her help! Her best words of advice on this is to season it to your taste... want more garlic? Add more... more oregano? ditto.

We served ours for dinner with freshly made garlic bread. Mmmm... I can smell the garlic now!

Meat Sauce with Garlic and Oregano
Serves 4
Source: Lauren!

1 1/2 Tbsp olive oil
1 pound ground beef
1 medium onion, diced
4 cloves garlic, minced
2 Tbsp fresh oregano, chopped
3/4 of a 796mL can diced tomatoes, undrained
1/2 of a 6oz can tomato paste
1 Tbsp sugar
salt & pepper to taste
Linguine or other pasta of your choice, cooked

1. Bring a pot of water to boil and cook pasta according to directions.

2. Meanwhile, heat 1 Tbsp of olive oil in pan, and cook onions until almost tender (about 5 minutes). Add garlic, and cook for another 60 seconds.

3. Add ground beef to the onion and garlic mixture, and brown meat until it is thoroughly cooked.

4. Once meat is cooked, add the tomato paste, and stir it into the meat mixture, cooking it for about 60 seconds. Then, add diced tomatoes, oregano, sugar, salt and pepper to the meat mixture, and simmer until the sauce becomes thick and most of the juices from the diced tomatoes are reduced - at least 20 minutes.

5. Once sauce is ready, stir in another small handful of fresh oregano, remove from heat and drizzle about 1/2 Tbsp of olive oil into the sauce and stir. Drain the pasta (don't rinse it!); Toss with meat sauce and serve!


Friday, September 4, 2009

Greek Pasta Salad


So, this is one of my go-to lunch dishes, and something that I seriously will have all year long (no matter how expensive it gets to buy out of season produce!). So, in the summertime I take advantage of the fantastic availability of local, fresh produce... perfect time of year to find bell peppers, cucumber and sweet cherry tomatoes... and lots of them!

I love this dish because it's so easy and so healthy. Actually, I've had a bit of free time on my hands over the last 10 months, and "for kicks" one day I decided to count my daily calories, and so I figure this dish to be around the 400 calorie mark. Pretty reasonable in my mind. The calorie counting only lasted about 2 days because it's just way to much work, and really, who wants to keep that up? I know, you don't care too much about calories either - you care about delicious food. And this is. Try it! You'll love it. And it's easy.

Greek Pasta Salad
Serves 2

1 cup Whole wheat rotini pasta
1/2 Bell pepper, chopped (I use any combination of red, orange or yellow peppers)
10-12 Cherry tomatoes, chopped
1/2 cup Long english cucumber, chopped (I usually cut off about 4 inches worth)
3 Tbsp Zesty Italian salad dressing
3 Tbsp Feta cheese, cubed
10 Black olives, sliced (not shown, but definitely improves the salad!)

1) Bring a pot of water to a boil, and cook pasta according to directions. Drain and rinse in cold water in order to cool down (I prefer the pasta to be cold in my salad).

2) Meanwhile, cut up bell peppers, cherry tomatoes and cucumber into bite-sized pieces. Slice the black olives if using them.

3) Add pasta and vegetables (well technically fruit) into a bowl, and mix in feta cheese and salad dressing. Mix and serve! See? Easy.

I always make this with store bought salad dressing, but have seen some interesting recipes for homemade italian dressing including this one at Our best bites that I want to try soon. Do you have any good recipes? Share them with me if you do!

Monday, August 31, 2009

Roasted Red Pepper Soup


Ok, so you know that you're starting to become a foodie when getting a cookbook for your birthday excites you, but I have to say that I'm so excited about this! I recently got the Joy of Cooking and couldn't WAIT to try one of the many soup recipes in there! I tried the Roasted Red Pepper soup and was pretty darn pleased with it. It has a little bit of tang, and that sweet red pepper flavour. Also, when I know I've had a fairly carb- or protein-heavy week, I can have this soup and get a few servings of my veggies for the day! Oh, and it fills you up too! I hate nothing more than having a bowl of soup, and being starving 2 hours later... this one has not been like that at all for me. Have a couple of crackers or croutons with it, and I can have it for lunch, and be good to go until dinner time!

Roasted Red Pepper Soup
Adapted from the Joy of Cooking
Serves about 8

6 large red bell peppers
3 tablespoons olive oil
2 cups chopped onions
1 cup diced carrots
1 cup diced celery
6 cups chicken stock (I used homemade)
3 tablespoons uncooked brown rice
2 tsp dried basil
1 tsp dried rosemary
1/4 tsp crushed red pepper flakes
1/2 cup milk (I used soy)
3 drops balsamic vinegar
Salt & pepper to taste

1) Roast bell peppers in the oven: Place whole (washed) peppers on an aluminum foiled lined baking sheet. Drizzle with a bit of olive oil, and place under the broiler (about 6 inches from heat). Roast for about 7-8 minutes until pepper looks blistered (it will look black)... rotating until the whole pepper is equally blackened. Once done, place peppers in a resealable plastic bag, seal closed and let stand for about 10 minutes (the peppers will steam, and help the skin to come off). Once the peppers are cool enough to handle, remove, peal and remove stems and seeds. Make sure not to rinse them at this point, as the smoky flavour lies in the surface. Cut into long strips and set aside.

2) Heat olive oil in a soup pot over medium heat, and cook onions, carrots and celery until tender. About 10 minutes or so.

3) Stir in the roasted peppers, chicken stock, rice, basil, rosemary and red pepper flakes. Bring to a boil, then reduce the heat and simmer until rice is tender, about 30-40 minutes.

4) Once cooked, remove the soup from the heat and puree until smooth. I pureed mine in a blender in batches (since I *gasp* don't have a hand-held immersion blender), which works just fine... just be careful when putting hot liquids in the blender, you don't want to fill it all the way up! It'll go everywhere if you put too much in at once.

5) Once smooth, return the soup to the pot and stir in the milk. In order to make sure the milk doesn't curdle since you're adding cold milk to hot soup, I actually ladle a couple of ladle-fulls of the warm soup into the milk first, in order to bring it up to temperature. Once warmed, I then add it into the full pot of soup.

6) Add the balsamic vinegar and season to taste. Yum.


Tuesday, August 25, 2009

Beef Chili


Do you ever have one of those days where you're just not thinking clearly? Well, did I ever have that day last week... It was probably 30 degrees (celsius) outside, and that was the day I decided to make homemade beef chili. You see, not only did I decide to make the chili, but it was also the same day I made the blueberry crumb bars. Ridiculous. The chili itself was incredible, but my goodness, was the house ever hot! Not that I'm complaining about the nice weather, but lets be honest, this could have been saved for a cooler day now that we're getting more of them. Oh well, I have to say it was worth it. The chili was probably one of the best beef chili's I've ever had. The chili had the perfect amount of spice and heat, and was the perfect ratio of beef, beans, veggies and sauce. We served it with homemade cheddar baking powder biscuits, and admittedly had it again the next day for dinner too. Same dinner day two doesn't happen very often around here, and so that's saying a lot about this chili. I hope you enjoy it as much as we did!


Beef Chili
Serves: 8 or more

2 pounds ground beef
1 tsp olive oil
1 medium onion, diced
1 stalk celery, diced
1/2 bell pepper, diced
1/2 jalapeno, diced
6 cloves garlic, minced
2 tsp cumin powder
3 Tbsp chili powder
1 tsp black pepper
2 tsp salt
1/2 tsp oregano
1 tsp garlic powder
1 tsp sugar
1 796mL can diced tomatoes
1 398mL can tomato sauce (I used the no-salt added)
1 7oz can diced green chilies, undrained
3 14oz cans kidney beans, undrained
1 Tbsp white vinegar
1 bay leaf

1) Heat olive oil and cook onions, celery, bell pepper, and jalapeno until just tender (about 4 minutes). Add garlic, and cook another minute or so.

2) Add ground beef to vegetable mixture and cook until mostly browned (note - only do this if you have the time to let the chili simmer on the stove for awhile, otherwise ensure that the ground beef is thoroughly cooked).

3) Add all the spices, stir and cook for a few seconds.

4) Add the diced tomatoes, tomato sauce, green chilies and beans. Stir in vinegar and the bay leaf. Bring to a boil, then lower to a simmer, cooking on low heat for at least a couple of hours (Cook it all day if you can - I let it simmer for about 2 hours or so).

5) Remember to remove the bay leaf when you're ready to serve. Enjoy!

Saturday, August 22, 2009

Heavenly Blueberry Crumb Bars


These blueberry crumb bars are so delicious! They are simply... well... heavenly. They are perfectly sweet, just enough blueberry, a hint of lemon, and the perfect amount of crumbly topping. Every time I make these they have only lasted a few days in our house before they are gone, and quite frankly I would happily eat the entire dish to myself, if I didn't know any better. My most recent excuse to make them (and really, who needs an excuse!), was to make them for my wonderful assistant at work, who has shown me so much love and support over the last 10 months. She is always so thoughtful, and was always checking in on me to see how I was doing, and so the least I could do was make these for her. Let me tell you, they were a huge hit.

I actually came across a variation of this recipe on several sites (For the love of cooking, One Perfect Bite, Smitten Kitchen, and I hear that it actually originated on Allrecipes.com), however I ended up adapting the version off Smitten Kitchen. Really though, I'm positive any one would be good.

Blueberry crumb bars
Adapted from Smitten Kitchen
Makes 24 medium size squares


3 cups all-purpose flour
1 tsp baking powder

1/4 tsp salt
1 cup sugar
1 cup cold butter
1 egg
1 tsp vanilla extract
Zest and juice of a lemon
4 cups fresh or frozen blueberries
1/2 cup sugar
4 tsp cornstarch

1. Preheat oven to 375F; Grease a 9x13 inch pan.

2. Mix together flour, baking powder, salt and 1 cup of sugar. Stir in the lemon zest.

3. Using a fork, cut in the butter into the flour mixture until the mixture is in pieces about the size of pea. Mix in the egg and vanilla. Don't worry the dough will be crumbly! Pat about half to 2/3 of the dough into the greased pan, and set the rest aside for the topping.

4. In a separate bowl, stir together 1/2 cup of sugar, the cornstarch and lemon juice. Gently stir in the blueberries. Once combined, pour the blueberry mixture evenly over the crust.

5. Crumble the remaining dough over the berry layer.

6. Bake for approximately 45 minutes or until top is slightly brown. Let it cool completely before cutting into squares.

These bars are easiest to cut and eat when cooled, and so we keep them in the fridge. If you are to impatient to wait like we were for the bars to cool completely before devouring, they are equally as good hot! They just fall apart quite easily when they are fresh out of the oven hot... consider it a type of blueberry crisp if you're going to eat them that way :)

Wednesday, August 19, 2009

Zucchini Bread


I learned this summer that when you are introducing "Zucchini Bread" to some new and unsuspecting 20-something, that it's best not to call it just that. I know it tastes delicious... you know it tastes delicious... but the response I heard back was a polite "No thank you - We can't see how some bread that tastes like zucchini will taste good". After an equally polite, well forcing him to try at least one piece, he now sees the light and realizes just how good it is. Maybe I should call it "Super Moist and Delicious with the perfect amount of Spice, Raisin and Walnuts Bread"... um, maybe a bit too long, but it would sure market better with the teens and 20-something's.

Well, I'm not kidding. It's delicious. We loved it. AND, it passed the hardest test of all around here (well in my mind)... Gram fell in love with it. She had me make her 4 loaves last week to store in her freezer. I always say that if Grandma likes it, it must be good! I always make this bread in loaves, but you could also do equally delicious muffins - how perfect would that be for having readily portioned sizes to take with you to work as a breakfast or mid-day snack?

Zucchini Bread
Source: Smitten Kitchen
Makes 2 loaves

3 eggs
1 cup olive or vegetable oil (I've tried both in this recipe, and both work equally good)
1 3/4 cups sugar
2 cups grated zucchini
2 tsp vanilla extract
3 cups all-purpose flour
3 tsp cinnamon
1/8 tsp nutmeg
1 tsp baking soda
1/2 tsp baking powder
1 tsp salt
1/2 cup chopped walnuts + a few more to sprinkle on top
1 cup raisins

1. Preheat oven to 350F; Grease and flour 2 loaf pans.

2. I like nice moist raisins in my zucchini loaf. To help achieve this, place them in a bowl of warm water for a couple of minutes to plump up (this can sit while you're preparing the rest); set aside. You will drain the water before you add the raisins to the mix later.

3. In a large bowl, wisk the eggs. Once beaten, mix in the oil and sugar. Mix again, then add in the grated zucchini and the vanilla.

4. Combine the dry ingredients: flour, cinnamon, nutmeg, baking soda, baking powder and salt. Add the walnuts and the (fully drained) raisins.
5. Stir the dry ingredients into the egg mixture until just combined (don't overmix!).

6. Equally divide the batter into the 2 loaf pans. For something a little bit extra, I sometimes sprinkle some of the chopped walnuts on top just before putting into the oven.
7. Bake for approximately 60 minutes, or until the tester comes out clean. If you were to do the muffins, they would bake much more quickly - probably 20 minutes or so. Enjoy your Super Moist and Delicious with the perfect amount of Spice, Raisin and Walnuts Bread!


Friday, August 14, 2009

Parmesan Baked Zucchini


It's August here in the lower mainland, which means lots of gardens and farms out there are overflowing with zucchini! I love it though, and so keep buying them. That said, I realized that we are getting a bit tired of the same old BBQ grilled zucchini, and so I decided to try something different this time. A couple weeks back I discovered these delicious looking Baked Zucchini Sticks at For the Love of Cooking, and what I loved about them was not only that they were baked not fried, but also that they looked super easy to make!! Let me tell you, they were fantastic! Not too cheesy, but had enough to make it a little bit crunchy; and the zucchini itself was perfectly cooked... nice and firm! Mmmm... delish.

I served these as a vegetable side dish, but it could easily serve as a mid-afternoon snack or appetizer.

Parmesan Baked Zucchini
Source: Adapted slightly from For the Love of Cooking
Makes 2 servings

1 small zucchini (Our zucchini was massive, so it ended up being 1/3 of a large one!)
1 egg
1/4 cup regular bread crumbs
1/4 cup grated parmesan cheese
Dash or 2 of garlic powder
Dash or 2 of dried basil
Salt & pepper to taste
Cooking spray

1. Preheat oven to 400F degrees. Line a baking tray with aluminum foil, and spray with cooking spray.

2. Beat the egg, and season with salt & pepper.

3. Combine the bread crumbs, parmesan cheese, garlic powder, dried basil, salt and pepper.

4. Cut the zucchini into thick spears. Dip into the egg mixture, and then into the parmesan cheese mixture, coating the zucchini.

5. Place coated zucchini onto a baking sheet; spray the tops with the cooking spray. Cook for approximately 10-12 minutes, flipping them over after about 8 or 9 minutes. Serve.

Thursday, August 13, 2009

Roasted Anaheim Pepper Corn Chowder

I first tried corn chowder only about 2 years ago, and I think I fell in love with it immediately! How could I have missed out on such a delicious soup for so long? This summer, I have tried at least 3 or 4 different corn chowder recipes now, and have yet to be disappointed... well except for the chipotle pepper version that was just WAY too hot! I do really love a corn chowder with a bit of spice in it though, and so when I saw this recipe for a Poblano Corn Chowder over at The Other Side of Fifty, I knew that it would be delicious. Poblano peppers seem to be very difficult to find around here, and so I've used Anaheim peppers instead, which worked perfectly!

This recipe also called for creamed corn, which I did include since I knew it would add a bit of creaminess, without too much of that fat. Next time however I think I'll leave it out the creamed corn, since you could probably achieve the same effect by just blending up half of it (while leaving some unblended for a bit of a chunkier texture that I love!)


Roasted Anaheim Pepper Corn Chowder

3 anaheim peppers, seeds removed
1 red bell pepper, seeds removed
1 onion, diced
1 stalk celery, diced
2 cloves garlic, minced
1 tsp cumin
1/2 tsp dried oregano
Salt & pepper to taste
3 Tbsp all-purpose flour
6 cups chicken broth (I used homemade)
2 medium potatoes, peeled & diced
2 10 oz cans creamed corn
2 cups corn kernels (fresh or frozen)
1/2 cup milk or heavy cream (I used soy milk)

1. Roast anaheim and bell peppers in the oven: Place whole (washed) peppers on an aluminum foiled lined baking sheet. Drizzle with a bit of olive oil, and place under the broiler (about 6 inches from heat). Roast for about 7-8 minutes until pepper looks blistered (it will look black)... rotating until the whole pepper is equally blackened. Once done, place peppers in a resealable plastic bag, seal closed and let stand for about 10 minutes (the peppers will steam, and help the skin to come off). Once the peppers are cool enough to handle, remove, peal and remove stems and seeds. Make sure not to rinse them at this point, as the smoky flavour lies in the surface. Dice and set aside.

2. Heat some olive oil in a large soup pot over medium heat, and add onions and celery. Season with cumin, oregano and salt & pepper. Saute until onions are soft (about 5-7 minutes). Add garlic, and saute for another 60 seconds.

3. Sprinkle flour over onion mixture, and stir to combine. Cook for about 2 minutes. Slowly add chicken broth to pot.

4. Bring to a boil, and add potatoes, creamed corn, and diced roasted peppers. Reduce heat and simmer for about 15 minutes. Add corn kernels, and simmer for another 5-10 minutes.

5. Remove from heat and stir in milk. In order to make sure the milk doesn't curdle since you're adding cold milk to hot soup, I actually ladle a couple of ladle-fulls of the warm soup into the milk first, in order to bring it up to temperature. Once warmed, I then add it into the full pot of soup. Taste and re-season if necessary.

6. If you like a smoother soup, puree in a blender or with an immersion blender. For a chunkier soup, serve as is. I served this with a garden salad for lunch. It also freezes really well. Enjoy!

Sunday, August 9, 2009

Light and Fluffy Blueberry Pancakes

Blueberry season here in the lower mainland is in full swing, and I am LOVING trying out all of the fabulous blueberry recipes out there. This weekend I drove out to one of the blueberry farms that are nearby, and bought three huge flats of blueberries (of which most will be frozen for future enjoyment!). With my fridge stocked with fruit, we've been eating the berries by the handfull, but I also wanted to make something else with them. I recently discovered this recipe for blueberry pancakes on Sidewalk Shoes, and I knew I had to try them. The pancakes were light and fluffy, and the blueberries added a bit of extra sweetness... YUM! Let me tell you, they were nothing like the heavy, dense pancakes that I remember having as a kid. My husband and I both enjoyed them so much, that we actually had them two days in a row - something that doesn't happen very often in our house! We will definitely be making these again.


Blueberry Pancakes
Makes approximately 10 pancakes (or if you like really big ones ~ about 5)

2 cups all-purpose flour
1 Tbsp baking powder
1/2 tsp salt
1 Tbsp sugar
2 eggs
1 1/2 cups milk (I used 1%)
2 Tbsp melted & cooled butter
1 cup blueberries (Next time, I'll probably even use 1 1/2 cups!)

1. Mix together the flour, baking powder, salt and sugar.

2. In a separate bowl, wisk together the eggs and milk. Stir in the melted butter.

3. Gently stir the milk and egg mixture into the dry ingredients. Mix only to moisten the flour; don't worry about lumps, since over mixing will cause it to loose its light fluffiness.

4. Gently fold in the blueberries.

5. Ladle the pancakes into a preheated non-stick skillet (I used a bit of olive oil for cooking). Cook for about 2-4 minutes in order to brown the bottom of the pancakes (when the bubbles start to appear it's time to flip!). Flip, and cook on the other side until brown. Enjoy! You'll be coming back for seconds, that's for sure :)

Thursday, August 6, 2009

From small beginnings come great things

I think I'm obsessed with finding the perfect recipe. Have a good soup recipe? I want to try it. My husband jokes that if I'm not watching a cooking show, flipping through a cookbook, or reading one of the fabulous food blogs out there, I'm probably writing down a new recipe that I've found. I love to bake, but love to cook even more. Nothing fancy, just simple, home-style family cooking. A year ago, I spent my days and nights working, and quite honestly was the queen of reheating frozen prepared meals (I know, I know... seems crazy now). Today, I can't even bring myself to buy a carton of chicken stock from the store, when you can very simply make your own (which, honestly, the homemade version tastes a million times better)!

Creating my own blog has been on my mind for awhile now. Since I've started to build up a small collection of so many delicious recipes, I had to share them! At the very least, this is a simple way for me to foster my love of cooking and to document each of the delicious recipes for all of our family and friends. Enjoy!