Sunday, October 18, 2009

Mikyn's Chicken Pot Pie


Mmmm, comfort food. Sitting here, thinking about it, I actually wondered to myself how chicken pot pie became a comfort food? Seriously, I don't think I ever remember eating it growing up - and if we did, I think it was rare. In any case, they are pretty much a staple in our house now, especially now that I've starting to make my own. They are a HUGE hit around here - we all love them. Normally, I make my own pastry crusts and everything, but this week I thought I'd try something a bit different by using a cheese-filled biscuit topping... not only was it a success in that it tasted really good, but by eliminating the pastry, it cuts out a lot of the extra calories normally found in pot pies. Calories aside, it's yum. Comfort food, yum.

Chicken Pot Pie
Mikyn's Kitchen
Serves 8 mini pot-pies or 1 large 9x11 pie

2-3 cups chicken broth
3 carrots, chopped
3 stalks celery, chopped
2 small potatoes, chopped (I used russet potatoes)
1 medium onion, chopped
1 cup frozen peas
1 cup roasted chicken, cut into bite-size pieces (or more if desired)
Sprinkle of marjoram
1 bay leaf
1/2 cup butter or margarine
1/2 cup flour
1 cup milk
salt and pepper to taste

1) Boil carrots, celery, onion and potatoes in chicken broth. Add marjoram and bay leaf; Season with salt and pepper. Once cooked, reserve chicken broth and set veggies aside.

2) Make a basic white sauce with butter, flour and milk. It will be very thick; add the reserved chicken broth to the white sauce to thin to desired thickness, making sure to keep it fairly thick. You want it to be a gravy consistency.

3) Add the peas, chicken, and reserved cooked vegetables to the gravy sauce, stirring gently.

4) Fill individual ramekins (or pot pie shells) with the vegetable/gravy mixture, and top with biscuit topping. I used this one, but instead of the raisins, use about a 1/4 cup of grated cheese. Bake at 425F for 12-14 minutes.


If you want to freeze the pot pies for future use, I recommend allowing the sauce to cool first, and then fill either your raw pie shells (or top with uncooked biscuit topping), and stick straight into the freezer to bake later. It's comfort food at it's best.

Monday, October 12, 2009

Pork Gyoza's


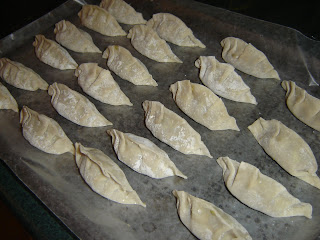
This past spring, I spent many of my days passing the time by watching the food network on tv, and saw this recipe by Anna Olson for Gyoza's and knew that I had to make them. It took me so long to try them out, because it seemed a bit daunting! When I finally did though, I was pleasantly surprised - they were surprisingly simple to prep and cook, AND they were delicious! They have the perfect blend of tang from the ginger and soy sauce, and are a nice light meal. I served the gyoza's with Anna's basic dipping sauce, and fresh vegetables.

While they are simple to make, the prep is a bit time consuming, and so you might as well make a whole batch all at once and freeze the rest - and that's what I did. They freeze really well, and in fact it makes them easier to cook.

Pork Gyoza's & Basic Dipping Sauce
Yields about 70 individual dumplings

Pork Gyoza's
1 pound green cabbage, finely chopped
2 tbsp garlic, minced
2 tbsp ginger, minced
1 pound ground pork
1/4 cup low sodium soy sauce
1 tbsp white sugar
2 packages round wonton skins, 70 piece (the one I bought came in a 2 pkg set)
1 tbsp olive oil (for cooking)
Hot water (for cooking)

Basic Dipping Sauce
2 tbsp low sodium soy sauce
1 tbsp rice vinegar
1/4 cup sesame oil

1. Using a food processor, blend in batches the cabbage until finely chopped, and transfer to a large bowl. Add the garlic and ginger and blend until finely minced, and add to the cabbage. Add to the cabbage mixture the ground pork, soy sauce and sugar, and mix. Fry a small patty in a pan to test for seasoning, and adjust to taste.

2. In order to prevent the gyoza's and wonton skins from drying out while I worked, I kept them covered, and worked in small batches of about 4 or 5: Brush the outside edge of the wonton skin with water, and please a teaspoon full of the meat mixture in the centre. Folder over the wonton skin to make a half circle shaped dumpling, and press the edges to seal the seam.

3. Place the dumpling seam-up on a wax paper lined baking sheet, and lightly press down to make the bottom surface flat.


4. Once you've filled up the tray, cover with plastic wrap and freeze for several hours. Once frozen, transfer the frozen gyozas to plastic freezer bags until ready to use.

5. To cook, heat the olive oil in a frying pan and add the frozen gyozas flat side down to the pan in order to brown slightly.

6. Add hot water to the pan to almost cover the dumplings, and cook about 8 minutes.

7. Remove the lid every so often, and gently shake the pan. Once cooked, and once the water nearly evaporates (or if it doesn't evaporate, drain out most of the remaining water), and allow the gyoza to fry in the remaining oil for another minute.

8. Mix together the basic dipping sauce ingredients soy sauce, rice vinegar and sesame oil, and serve with gyoza's. Enjoy!

Monday, October 5, 2009

Baking Powder Tea Biscuits


You know, for the reward you get from something so simple, it's a wonder that I don't make these every week. The only take about 20 minutes or so from start to fully cooked, and are SO GOOD when they are done. I've tried these tea biscuits plain and they were delicious at that (particularly when they're hot out of the oven), but they are even better when you add extras to them! I've tried quite a few variations, and so it's pretty fun to adapt them depending on your mood, or whatever you're having that day. The ones I have pictured here have raisins in them, which was a complete home run with grandma - these ones go absolutely perfect as an afternoon snack with tea or coffee. For my husband and I, our favorite is when I make them to go with chili - in that case, instead of raisins I use grated cheddar cheese instead.

I have to admit, I did have a bit of a disastrous experience when I tried to make these with frozen blueberries. Don't do it. If you aren't going to listen to me, and are going to attempt these with frozen blueberries (or any fruit for that matter), do NOT let the berries thaw first - that's where I went wrong - keep them frozen or else they burst and make the batter much much too moist. Picture me standing in the kitchen with a gloppy mess, and grandma walking in, looking at me and just saying "what are you making??" Despite the mess, I cooked them anyways. Definitely not as pretty looking as the others, but they taste good still. So there.

So, go ahead and try them - it can't go worse than what I experienced.


Baking Powder Tea Biscuits
Source: Unknown (I got this recipe off a girlfriend, but don't know where she got the recipe from)
Yields 10-18 biscuits

2 cups all-purpose flour
4 tsp baking powder
1 tsp salt
1/4 cup butter, cubed
1 cup milk (I used 1%)
(Optional - whatever addition you want to add such as a handful of raisins, cheddar cheese, or gasp! frozen blueberries)

1. Preheat oven to 450F degrees.

2. In a large bowl, mix together flour, baking powder and salt. Cut in the butter with a fork until the mixture is the consistency of cornmeal. **If you are going to add any extras such as raisins like I've done, now is the time to add them.

3. Make a well in the centre of the flour and add the milk. Once added, stir vigorously until the mixture comes free from the sides of the bowl. Turn dough out onto a lightly floured board and knead lightly for a couple of minutes.

4. Roll the dough out to about 1/2 inch thick, and cut dough into biscuits with a 2" biscuit cutter (or simply an overturned glass like I've used).

5. Bake for 12-15 minutes. Around here, they definitely taste best hot served straight from the oven, though you could let them cool on a cooling rack if they last that long. Enjoy!

Sunday, October 4, 2009

End of Soup Week: Creamy Chicken and Wild Rice Soup


So, I decided one day that it was time to venture out from my corn chowders and chicken noodle soups, and like usual wanted something quick and simple. You know when co-workers start saying to you "how's the corn chowder?" before they even see what soup I'm eating that particular day, that it's time to vary it a little bit! Well, I had seen this recipe a couple of months back on the Picky-Palate, and not only did it look delicious, but I knew I wanted to try it right away - especially since I happened to have all of the ingredients on hand. I think its both the wild rice and the spinach in this soup that make it so tasty. Since I freeze all of my soups to enjoy later on for work lunches, I just leave the spinach out when I freeze it, then add it to the soup once it's reheated.

Creamy Chicken and Wild Rice Soup
Source: Picky-Palate
Serves 6

1 onion, chopped
4 carrots, diced
3 cloves garlic, minced
3 cups homemade chicken broth
1 can Cream of chicken soup
1 can Cheddar cheese soup
3/4 cup milk (I used soy milk)
2 cups roasted chicken breast, chopped into bite-sized pieces
1 cup cooked wild rice
Salt and pepper to taste
Spinach, shredded into smaller pieces (For a whole pot of soup about 4 cups; for individual soup about 1/2 handful per bowl)

1. In a large pot, saute onions and carrots over medium heat until soft (about 5-7 minutes). Add garlic, and cook stirring constantly for another 60 seconds or so.

2. Add chicken broth, cream of chicken soup, cheddar cheese soup, milk, chicken, salt and pepper. Bring soup to a boil. Once heated through, remove from heat and stir in the spinach. Serve immediately ~ enjoy!

Friday, October 2, 2009

Soup Week: Roasted Chicken and Barley Soup


Since I had a lot of time on my hands this past winter, and wanted something else to do whenever I had the energy to do it, I thought making homemade chicken noodle soup would be a good start. It was pleasantly simple to make, and was an excellent comfort food on top of that. I've never been a fan of the packaged or canned chicken soups out there, and now I'll never go back. The soup is so delicious and is full of tons of vegetables, nice big chunks of roasted chicken, and lots of flavour. Thanks to my grandma for teaching me how to make this.

PART 1: Homemade Chicken Broth
Mikyn's Kitchen

Chicken carcass and bones, meat removed
10-12 cups water
4 carrots, chopped
4 stalks celery, chopped
1 onion, chopped
1 tbsp dried thyme
1 tbsp dried basil
1 tsp dried marjoram
1 bay leaf
1 whole clove garlic, peeled (optional)
Salt
Pepper

Homemade chicken broth is most easily made from the leftover bones and carcass of a roasting chicken. Once the chicken is roasted, remove as much of the chicken meat from the bones as possible, reserving for future use (If you leave the meat on the bones, it tends to go rubbery, and so it's better to remove before making the broth).

In a large pot, add the bones, carrots, celery, onions, water and spices, and bring to a boil. Once the water comes to a boil, remove any scum, reduce the heat and simmer on low for 1.5-2 hours. After a couple of hours, taste and re-season as necessary - salt is definitely the key here. Don't be afraid to add some - it will still be less than the canned versions in the store.

Strain out the vegetables, bones and bay leaf, reserving the broth. If you allow the broth to cool in the fridge overnight, you can easily remove any fat that may have solidified on top - I find though that the roasting of the chicken actually renders most of the fat, and so there's usually very little left. Enjoy as needed in your recipes.

PART 2: Roasted Chicken and Barley Soup
Mikyn's Kitchen
Serves 8

10 cups homemade chicken broth
4 carrots, chopped
4 stalks celery, chopped
1 onion, chopped
1 cup roasted chicken, chopped into bite-sized pieces
1/3 cup barley
Salt and pepper to taste

1. In a large pot, add the chicken broth and bring to a boil. Add carrots, celery, onions and barley, and cook until soft.

2. When nearly done, add the chicken and heat through. Taste and re-season as necessary. Enjoy!